How to create your plastic card database
We have created a standard database layout to print your PVC cards smoothly. This will decrease the possibility of any errors being made in your artwork.
We know that this is a stressful process. Please follow along with us and find out how to correctly supply your artwork for us to print.
What is a database?
A database is where you store all your card information that you want to print on Google sheets or Excel!
Why do you need a database?
Databases are necessary to store large volumes of data in one place (e.g. your employee's information). All the essential information you want to print can be stored and linked to your card design.
We know that this is confusing. That is why we are going step by step through this for you to supply us with the correct formats to print your beautiful cards.
Data collection:

The only information that should be included in the database is what you want to print. This will be data that keeps changing from person to person. We refer to this as variable data that changes on the cards.
Including:
- Name
- ID number
- Position of work
- Date employed
- Image
Information remains the same: This does not need to be in your database but can be designed on your card in your design software (Affinity, Adobe, Canva...)
- Logos
- Company name
- Titles
- Categories
Layout of database
Please follow the outline above when laying out your database. You can use google sheets or excel for this.
Column headings must be in the first row and speculate the type of information you include on your card.
IMPORTANT: Please ensure that the images inserted in your database match the unique number (e.g. employee ID) of the file associated with the information in that row. Incorrect image names will result in inappropriate images printed on the card. Please check your spelling.
NOTE: If you do not have a unique number, you can use a google sheet formula to create one. Here is a formula you can use =DEC2HEX(RANDBETWEEN(0, 4294967295), 8). Copy and paste this into the column you wish to make your unique number.
Please make sure that you spell all your names correctly. Names that need to be printed in all caps must be put in all caps. Incorrect spacing or misspelt words will appear on your card if you do not check them before sending.
Note with column formatting: when entering number information, it is essential that cells with numbers beginning with 0 are formatted as “text” and then entered precisely as they should be seen on the card.
Now you can type all your data into the fields. Notice: here, we have left the photo column blank. Next, we will look at how to edit and save your images in the database.
Images

Photos must be supplied in .jpg format and the actual size required for the card. This is usually 51 x 51 mm.
Please keep each image consistent:
- Background must be the same
- Distance to the subject must be the same
- The size of the image must be the same.
- This is important for a professional-looking card.
NB: these images must be put into a separate folder from the database when sent with the artwork to match the database to the pictures.
When naming the pictures, please give them a unique ID name so you can match them to your unique ID number. This prevents any spelling errors and issues with the database.
Steps
1. Open Canva. Design your image as being a photo ID (51 x 51 mm)
2. Make the necessary adjustments
- Make any colour corrections that you find necessary.
- Ensure the pictures are not too dark and all the faces are visible.
- Save your images onto a folder (named staff) that you can access on your computer.
- Save it in a folder you can find easily.
3. Save all your images as .jpg in this folder and make sure you can spell this name correctly.
4. Type the exact number that you named your photo into your database and indicate the file extension. The file extension for a JPEG file is ‘.jpg’. This photo is called 1234, and the file extension is .jpg. In the database, we will input 1234.jpg in the photo column.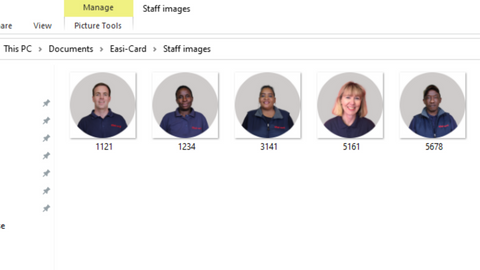
5. You will save all your photos into a folder you will send us using a unique number to identify them.
6. Once all your data is ready, save the file as an Excel spreadsheet (.xls) and email all the images and the database to your Easi-card salesperson.
7. If multiple batches are sent in the same database, empty rows or rows with identifying text can be sent as separate batches (please inform us of this).
You have now created your very own database. We will now print your cards. Usually, this takes up to 10-14 days. Thank you for your patience.
